Showing posts with label projects. Show all posts

PROJECTS > SPRING CLEANING 101


Spring is just around the corner which means it's time for fresh flowers and….deep, deep cleaning?  Yep!  
The best way to kick off Spring is with a fresh, clean house.  So open those curtains, let in some light and let's get going! 
First off you're going to need some supplies.  I prefer natural products that don't contain any toxins and don't require I wear a gas mask while cleaning. 

1 // 2 // 3 // 4 // 5 // 6 // 7


Next you'll need a plan, right?  I've rounded up just a few checklists for you to get you started: 


Ok you're ready to get started...Happy Cleaning! and Happy Spring! 

{top photo via 100 Layer Cakelet


PINTEREST PROBLEMS

If you're like me you have a pinterest obsession (really who doesn't?)  but my problem is I pin and pin and pin and never seem to do much with those pins.  It's fantastic for endless hours of "inspiration" but actually turning that inspiration into something is a totally different ball game.  So I've decided to make a conscious effort to start:

who's with me? I plan to read that book, start that project, make that recipe, buy that dress? and I'll tell you all about it right here.  

RESOLVING TO...LIVE ORGANICALLY

When I say "live organically" I'm not just talking about food.  I want to introduce a little organic into my beauty regime.  I found some DIY body scrubs from Whole Living and decided to give their DIY Honey Scrub a try.  All ingredients you should already have at home.  The verdict?  My once dry, rough, winter skin feels AMAZING.  And it didn't cost me a thing. Win and win. 


via whole living

DIY HONEY SCRUB: 

Add 1 teaspoon pure honey to 1/4 cup light olive oil.
Blend with 1 cup raw or granulated sugar. 
Mix in 2 teaspoon fresh citrus zest. 
Blend until well mixed, then store in a jar.

Have you ever tried a DIY beauty trick at home that you love?  Please share! 

GLITTER YOUR GIFTS

Happy Monday to all of you! Christmas Eve is in ONE WEEK!! I don't know about you but I'm ready for some down time with the fam.

So last week I showed you how to easily glitterize a plain gift box.  And today I'm showing you how to easily add a little extra goodness to said gift box.

I'm big on repurposing around here - mostly because going to a craft store this time of year is a living nightmare.  So I gathered some basic items: branches from my tree, twine, ribbon, feathers, some glitter and a snowflake ornament.  Use whatever you have around the house to add some personalize pop to your presents.

Most are pretty self explanatory but the glittery feather idea came from this tutorial.

Happy Wrapping!

HOW TO MAKE YOUR PRESENTS SHINE {IN ONE GLASS OF WINE}

Happy Friday my friends! Another weekend is upon us and technically the last weekend (unless you're suuuuper last minute) to wrap up your holiday crafts, wrapping, shopping - all that good stuff! 

I don't know about you but I love to create my own personal gift wrapping - I think it actually makes the gift inside just a little bit better.  Last year I bought the gold glitter wrapping paper from paper source and while its super pretty to look at it was not super cool to work with.  (Pretty tough to get that glitter to stick to itself...)

So this year I decided to try it again...but with a slightly different technique.

photo by me

Here's what you'll need to create this super easy polka dot packaging:

- 1 glass of wine (I prefer red)
- Your favorite Pandora holiday station (I prefer Michael Buble)
- A basic gift box - mine was free from Anthropologie
- Gold (or another color of your choosing) glitter wrapping paper 
- A circle punch - I found mine at Michaels
- Adhesive dots (I LIVE for these things!)

Pour your wine, turn on your holiday tunes and start punching out those glittery circles. Once you have them punched out - lay a polka dot pattern over one side of your box.  Once you like the look of your pattern, take your adhesive dots and start sticking! That's it!

While these look fantastic as they are - next week I'll show you the different ways I spruced them up!

Happy crafty weekend to you! xo

DESIGN YOUR OWN CUSTOM FONTS

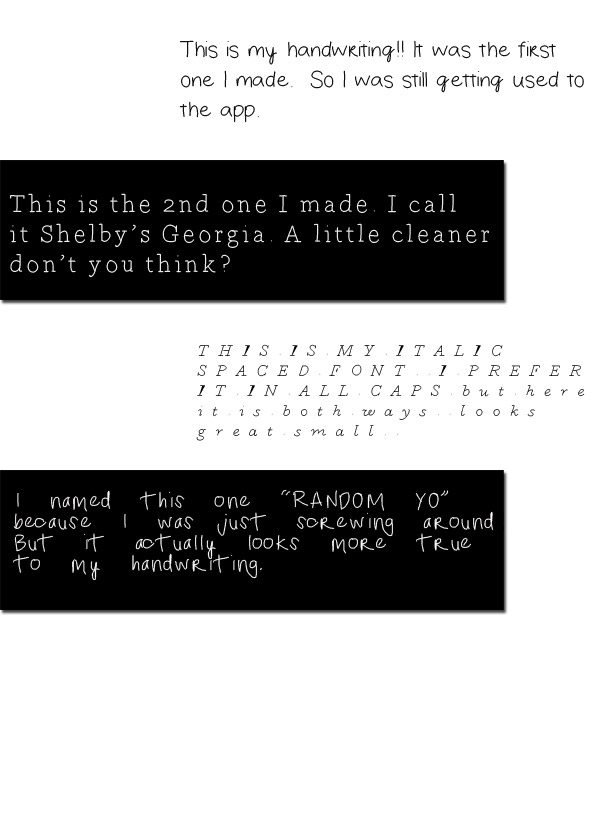
OK this may just be the coolest thing ever.  I found it over on Brit + Co (a really cool app I have for my phone that features all sorts of great DIY ideas, crafts, gifts, beauty etc- check it out!) Anyway - there's an iPade app out there called iFontMaker ($6.99) that helps you create your own custom fonts from your own handwriting and then download them onto your computer to use on your blog or wherever you please!  It's seriously addictive!  Super easy and quick (unless you are a perfectionist - which I most certainly am not!) Here's what I came up with - please excuse my terribly unimaginative names - I wasn't expecting it to be so awesome and to want to share them with you! You can download each of them with the links below and please don't judge my handwriting. enjoy!
DOWNLOAD THEM HERE: Shelby's Handwriting //  Shelby's Georgia // Shelby's Italic Spaced // Random Yo

TRIED IT: HALF MOON MANI

Ever since I first saw this tutorial on The Beauty Department I've wanted to give the half moon main a go...and I finally did.  And it was pretty easy!  (Definitely let the top coat dry longer than 10 minutes before peeling off the circle sticker thingies.)  I received a TON of compliments on them and will definitely be sporting many more color combos this season.  (Though the trout pout + penny talk is pretty tough to beat.)  Have you embraced the DIY mani craze?  Any others I should try?